如上篇文章所说,3D Touch 主要分成三个模块: Home Actions, Peek & Pop, Force Properties。上篇文章中总结了 Home Actions的相关知识点以及如何接入该功能。本文将用来介绍Peek & Pop 的相关知识点。
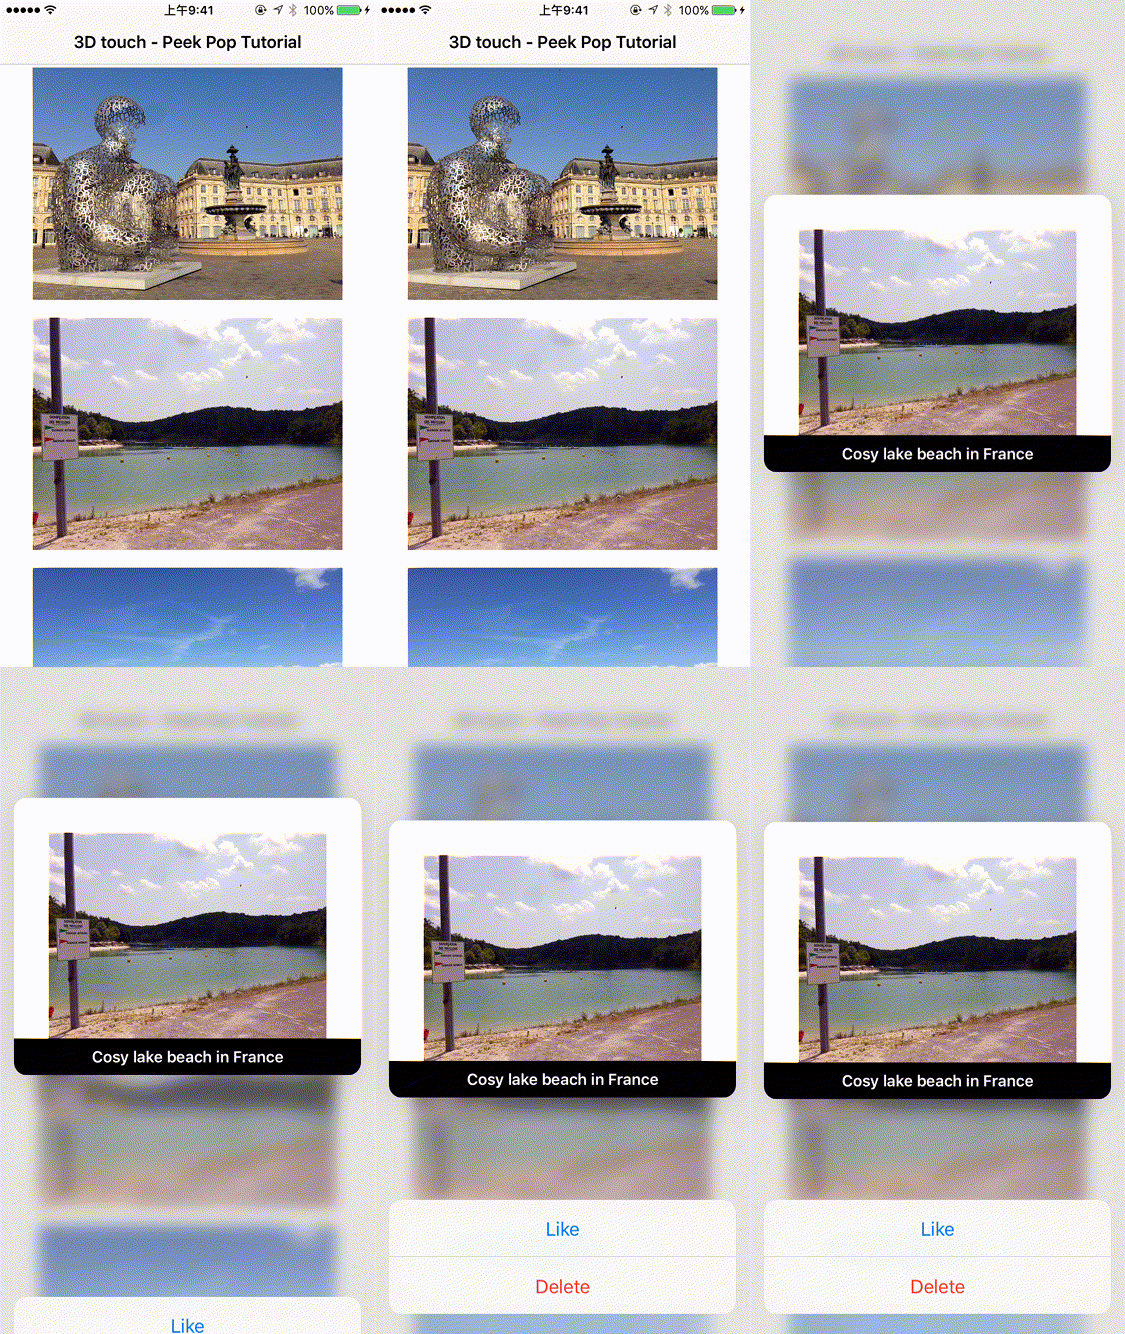
在给你的app接入peeking and poping 的功能之前,需要先了解该操作的三个属性, peeking, preview actions, poping。如下图所示:

用户在 Peeking 图片,视频,网页等内容的时候,能够在不去加载全部内容的情况下获取到更多详细的内容。
##PEEKING
当用户对某个view做peeking操作时,程序会展现给用户相对应内容的快照。Peek 操作是 3DTouch 中实现起来相对比较复杂的模块。Peek and Pop API 中有一个 UIViewControllerPreviewingDelegate,给指定的view需要注册这个delegate,就可以接收到系统回调过来的3D Touch事件。
override func viewDidLoad() {
    super.viewDidLoad()

    /*
        Register for `UIViewControllerPreviewingDelegate` to enable
        "Peek" and "Pop".
        The view controller will be automatically unregistered when it is
        deallocated.
    */
    registerForPreviewingWithDelegate(self, sourceView: view)
}
这里有一点需要注意,我们可以在一个 view Controller 中,给多个view注册 Previewing Delegate ,但是我们不能反复去注册同一个view。
“You can designate more than one source view for a single registered view controller, but you cannot designate a single view as a source view more than once.”
Peek的操作过程可以分解成下面三个步骤:

Peek的系统回调函数会提供一个关于 source view的context,以及 touch事件的point。以sourceView为 collectionView为例,回调函数中我们需要处理以下三件事情:
- (1) 根据 location 找到被 peeked 的 cell,以及cell的 NSIndexPath
- (2) 设置 previewingContext 的 sourceRect 大小
- (3) alloc 一个 PreViewController,并设置背景图片,title之类的, 然后返回这个 PreviewController
UICOLLECTIONVIEW 代码片段
override func viewDidLoad() {
    super.viewDidLoad()

    registerForPreviewingWithDelegate(self, sourceView: tableView)
}

func previewingContext(previewingContext: UIViewControllerPreviewing, viewControllerForLocation location: CGPoint) -> UIViewController? {
    guard let indexPath = collectionView?.indexPathForItemAtPoint(location) else { return nil }

    guard let cell = collectionView?.cellForItemAtIndexPath(indexPath) else { return nil }

    guard let detailVC = storyboard?.instantiateViewControllerWithIdentifier("DetailViewController") as? DetailViewController else { return nil }

    let photo = photos[indexPath.row]
    detailVC.photo = photo

    detailVC.preferredContentSize = CGSize(width: 0.0, height: 300)

    previewingContext.sourceRect = cell.frame

    return detailVC
}
UIPREVIEWACTIONITEMS
当用户在 PreViewing Controller 的界面,手指往上推,会从屏幕底部弹出一个类似 actionsheet 的界面,这个是 UIPreviewActions。那如何给指定的 preViewController 自定义这些 UIPreviewActions? 方法很简单,override UIViewController 中的 preViewActionItems() 方法,在该方法中定义好 actionItems 的数组就好了:
override func previewActionItems() -> [UIPreviewActionItem] {

    let likeAction = UIPreviewAction(title: "Like", style: .Default) { (action, viewController) -> Void in
        print("You liked the photo")
    }

    let deleteAction = UIPreviewAction(title: "Delete", style: .Destructive) { (action, viewController) -> Void in
        print("You deleted the photo")
    }

    let groupAction = UIPreviewActionGroup (title: "Group", style: .Default, actions: [likeAction, deleteAction])
    return [likeAction, deleteAction, groupAction]

}
另外苹果还提供了 UIPreviewActionGroup,顾名思义就是把几个UIPreviewActionItem操作放到一起,组成一个组。
POPPING
poping 操作处理起来相对简单。在回调函数中
func previewingContext(previewingContext: UIViewControllerPreviewing, commitViewController viewControllerToCommit: UIViewController) {
    //Here's where you commit (pop)
}
我们需要根据preViewingContext来确定poping的时候需要commit的ViewController就好了。
WEBVIEW PEEK AND POP
让 UIWebView 和 WKWebview 支持 Peek&Pop就很简单了:
webView.allowsLinkPreview = true
##结语
以上。